Monday, 29 April 2013

Marisha Aya -week 6 - final!!

Heyhey!!!
So here is the final post for this project! hope you guys liked the development over time, the thoughts, the ideas and the understanding that have/has become part of the process to reach this final stage!!


model 1 fig. 1

model 1 fig. 2
model 1 fig.3

From my previous work, I decided to use my wooden model as a means to help direct the shapes, the forms, the 'mass', the 'solids' and the 'voids' in my final model. However, as I completed this model, I started realising that the space was too 'DEFINED'. The model ended up actually looking like a structure, the materials informing the directly obvious associations; the cardboard planes being the walls, the wooden platforms looked very much like decking and the acetate clearly being a window. I understood then, that I had moved away from the focus and the whole point of the task in the first place.

In order to figure out where I had gone wrong on the first place, I traced back to the origin of the task; to create a 'space' which could be 'occupied'. My interpretation of the word 'occupied' is where I went wrong. During the initial stages of making the final model, my first thought in relation to create a space which could be 'occupied' was some form of a shelter, something that protects from the exterior, which then immediately flicked to a building, because well, that's architecture right??

I talked to a few of the tutors about this (and I mentioned this in my critique too) that I was led out to the stairs outside our studio, (the ones that lead down to the main car-park) and asked whether I was occupying the space (yes) and whether the stairs were sheltered in anyway (no). It was then that I actually understood...

A space need not be defined in anyway for it to be occupied or used. Furthermore, our interpretations o the word 'occupy' are often misled, (it was in my case anyway!) and has more than just one way of looking at it. 

Keeping all this in mind, I created a new model, that made the best use of my new-found understanding.


model 2 Fig. 1

Model 2 Fig. 2

Model 2. Fig 3

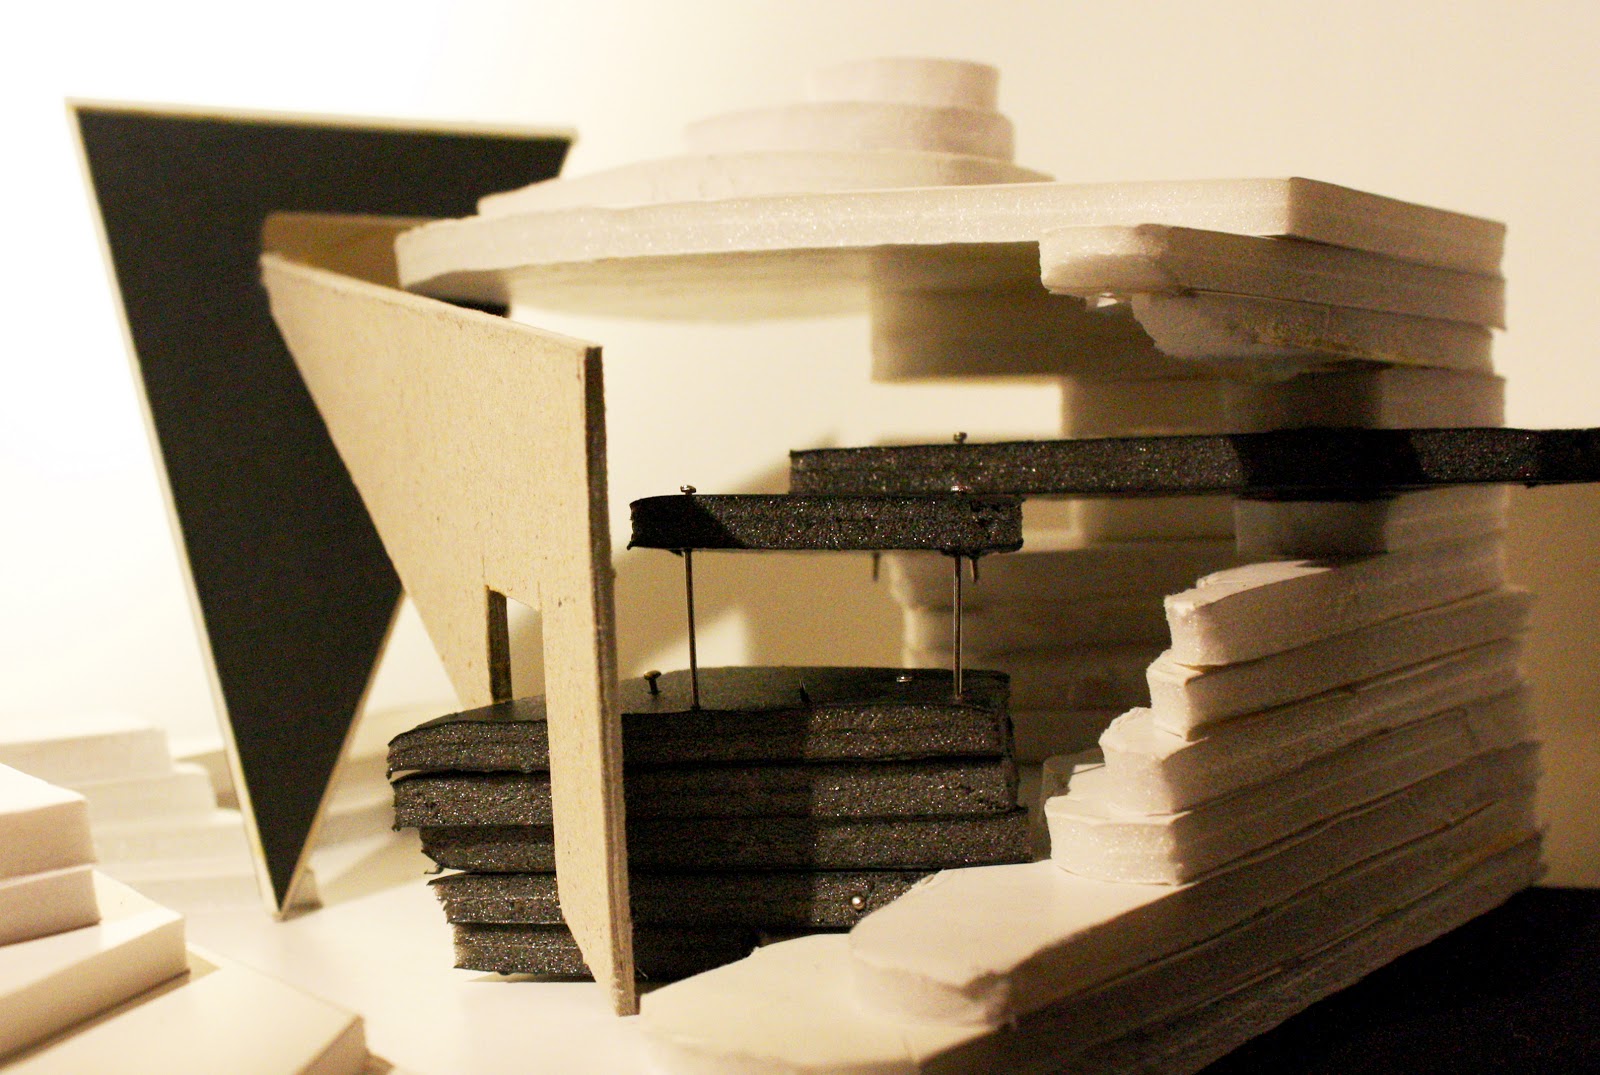
I still wanted to make the best use of the idea of 'exposure' and 'enclosure' I had designed in the previous week, so I created a series of spaces that segregated one from another. The images above clearly illustrate that. The upside down pyramid is my 'solid' and was used as a means to heighten the 'enclosed' aspect of the site positioning alongside the natural enclosure the cave provides. Also, the contrasting plane (the only one that is not black) adds to this segregation; doing so by cutting off the occupants view from the 'inside' to the 'outside' save for the little opening that allows the flow from one space to the other.

What I aimed to achieve was not only the segregation of the two, but moreover the DRAMATIC change from one (enclosed) to the other (exposed) in a very short space/ period of space. This can be understood by comparing how much of the model is part of the enclosed to the amount of space allocated to the exposed. I found this play of spaced and the change from one to another very interesting and wanted to understand what could be created if this play was pulled to extremity, which my model tries to achieve!

However, even though I thought I had moved on from the 'defining' aspect, one thing still creeped into my new model, the thing being the rectangular opening, which is instantly identified as a door! (LOL, it's funny to see how our conceptions of architecture as so engrained into our subconscious!) But I have changed that and a few other things! will load pictures up of the final final as soon as I can!

I would love to hear any ideas or added thoughts/comments from you guys! 

See you all tomorrow!
-Marisha


Friday, 26 April 2013

Randi Futialo- Project 1, Week 4


This is the section drawings for my paper model. In these sections I have only drawn what has been cut in order to show the change in space and placement of the paper.


For the section drawings of my wood model, I have drawn the parts that have been cut as well as what you you see beyond the cuts. This is understand and show the depth of space within the model.


This is the section drawings for my wire model. Like the section drawings for my paper model, I have only drawn whats been cut. Again this is to show the rate of change in space within  my model.

Monday, 15 April 2013

Aneesa Hussain- Week 5 mass + void

My final contour model was not based on my refined contour as it was a bit too simple and wasn't as interesting. Therefore i used my final contour from week one it had  more contour lines and was more busy, i could imagine by looking at the contour drawings the mountains and valleys and the varied heights. 

The model has been modified a little because the height requirement is 75mm so i doubled the thicknesses for a few of the contours to get it to this height. I also used foam board to create this model, it was easier to cut out curves and also is thick.


CONTOUR MODEL

AREAS ON THE CONTOUR MODEL

 On the contour model i found many spaces where the model can be placed. I used the paper model of my shape which is a square based pyramid to show how it could sit on the site.
 
VALLEY- surrounded by the two mountains on each side, feel enclosed and when looking from the building the rest of the site can be seen.

CENTER OF THE SITE- building is surrounded by the mountains and valleys so diffrent view from each point. Space is also created at the bottom as the building is raised.

NEXT TO THE HIGHEST MOUNTAIN- enclosed space surrounded by mountains in the front and back.

ON TOP OF THE MOUNTAIN- would get a view looking down on the valley and mountains becomes quite dominant.

The task for the model to be placed on the contour model was to construct a solid of the primitive form, we had to double the volume of the solid primitive and had to create space. This part of the assignment made me really confused as i didn't really know what i had to do. i asked different tutors on how they would see the assignment as and how they would go about doing it. i started getting a understanding so made my draft model. To me it felt like i wasn't doing what was asked in the brief but i had a go so i could get feedback on how to make it better.

DRAFT 

During the crit on Thursday is where i fully understood what was asked to create this model  while other students were talking about their work. It was creating space but not making it obvious. it could be open space it doesn't have to have walls to show a room but it should have the essence of the shape of the primitive. 

With the new understanding of how to create the model i had another shot at it and below is what i ended up with.


For this model i used my wood model and paper model and based it on that to help me come up with this model. In this model you could imagine someone walking through it and reaching to different parts of the building. I also used the relationship of the landscape and the model to create space. So there is space created under the pyramid as well as on the top on the other side. I used the basic and obvious shape to create space.

MASS + VOID COMBINATION + SITE


LOOKING FROM THE TOP


 I think my model sits well on the contour  model. i used wire to show where poles or support would be needed to keep the building from falling. I made the bottom of the model flat so it can be placed on the site effectively rather than having a point and also because that is where people would be entering from it allows them to walk on a flat plane. The model is placed on a little mountain and the surrounding has various heights. I placed the model here because it standout as well as have surrounding around it making the bottom section enclosed. The rest of the site can be viewed from this point to as it flows down. 


Sunday, 14 April 2013

Sameer Azim week 5 - mass+void


this is my first draft model i came up with  i used one of my draft primitives as my base shape and then brought element of my wood model and did the shapes on that model on this model , but this model is suitable for a flat surface ,and my contour model is has highs and lows 
this the 2nd model a cam up with in this one i  cut the cube to an angle so it sits across form the bottom of my model to the top part of my model .


this is my final model with the contour model i used black so it the model shows in the the white contour model i added a few more plains so that the model flows around the site more better.i think that this model flows really well wit the site and that it does not just sit there , it consumes different levels of the site


Friday, 12 April 2013

Randi Futialo- Project 1, Week 3


Here is my Acetate primative. I have decided to use an octahedron as my shape because it is not as simple as a square and it has more volume than a triangular pyramid.


Paper: I've constructed my paper model by using the contour lines of my acetate as a guide line. By doing this, I've ended up with various cylinder/cone shapes and curves. This shows interesting space, gives you the feeling of being directed into an unknown area when you liik through the 'tunnels'.

Wood: Again, I have used my acetate model as a guide line in order to form shapes within my primative. If you look at my acetate model, there are three main corners where contour lines are circulating it. With my wood model I've tried to capture the three corners and ended up with linear planes directing towards the centre.

Wire: My wire model has a similar approach to my wood model with the three main corners being surrounded by contour lines. But instead to having linear lines going toward the centre, I had curved lines spiralling inwards. I have also acknowledged the obvious voids within my acetate model; the two circles across eachother where I've created a tunnel-like void, and also the big gap in the middle where there were no contour lines at all.

Feedback Thursday's crit

Hi everyone,

The crit went well yesterday and you seem becoming more confident when you have to present your work which was one of the aim of the exercise.
As explained, it is an unmoderated assessment and we'll review your work after the 2 weeks break, try to make the most of the chance you have to improve the quality of your work.
I  had some good surprises with your models and sine Tuesday most of you have worked a lot and i wanted to thank you for the quality of your presentation.
Now don't forget to post it too :)
Enjoy you break and use the blog to ask the opinion of your colleagues or friends about your projects.


Also i told you about some famous architect, you'll find below their name and some photos of their work.
See you soon
Cheers
Marie :)

                                                  Ronchamp chapel  by Le Corbusier (Ian told you about it)


                                                      Art Museum - Porto by Alavaro Siza


Church of light by Tadao Ando